
Newsletter Subscriptions with NextJS & ConvertKit
Newsletter subscriptions are a mixed bag for me. On the one hand, from a marketing perspective, your subscriber list (that you own, and not FB or X) is probably your most valuable asset.
On the other hand, writing newsletters is a pain.
My goal here, I think, is to put in place something EXTREMELY automated... something along the lines of:
- Write an MDX blog post
- Commit to Git
- Vercel auto-deploys (already happens)
- Git hook fires to an API route
- A newsletter is drafted and sent to my contacts
That would be nice. We'll see if I can get there eventually. But for today, I just need a way to let subscribers register from the site.
ConvertKit seems to get close, which is why I'm trying it out. If you have a recommendation, please share it on Twitter
So with that out of the way, let's get started! ⚡️
Create a ConvertKit Account
First things first, head over and create an account at ConvertKit.
Set up a contact group
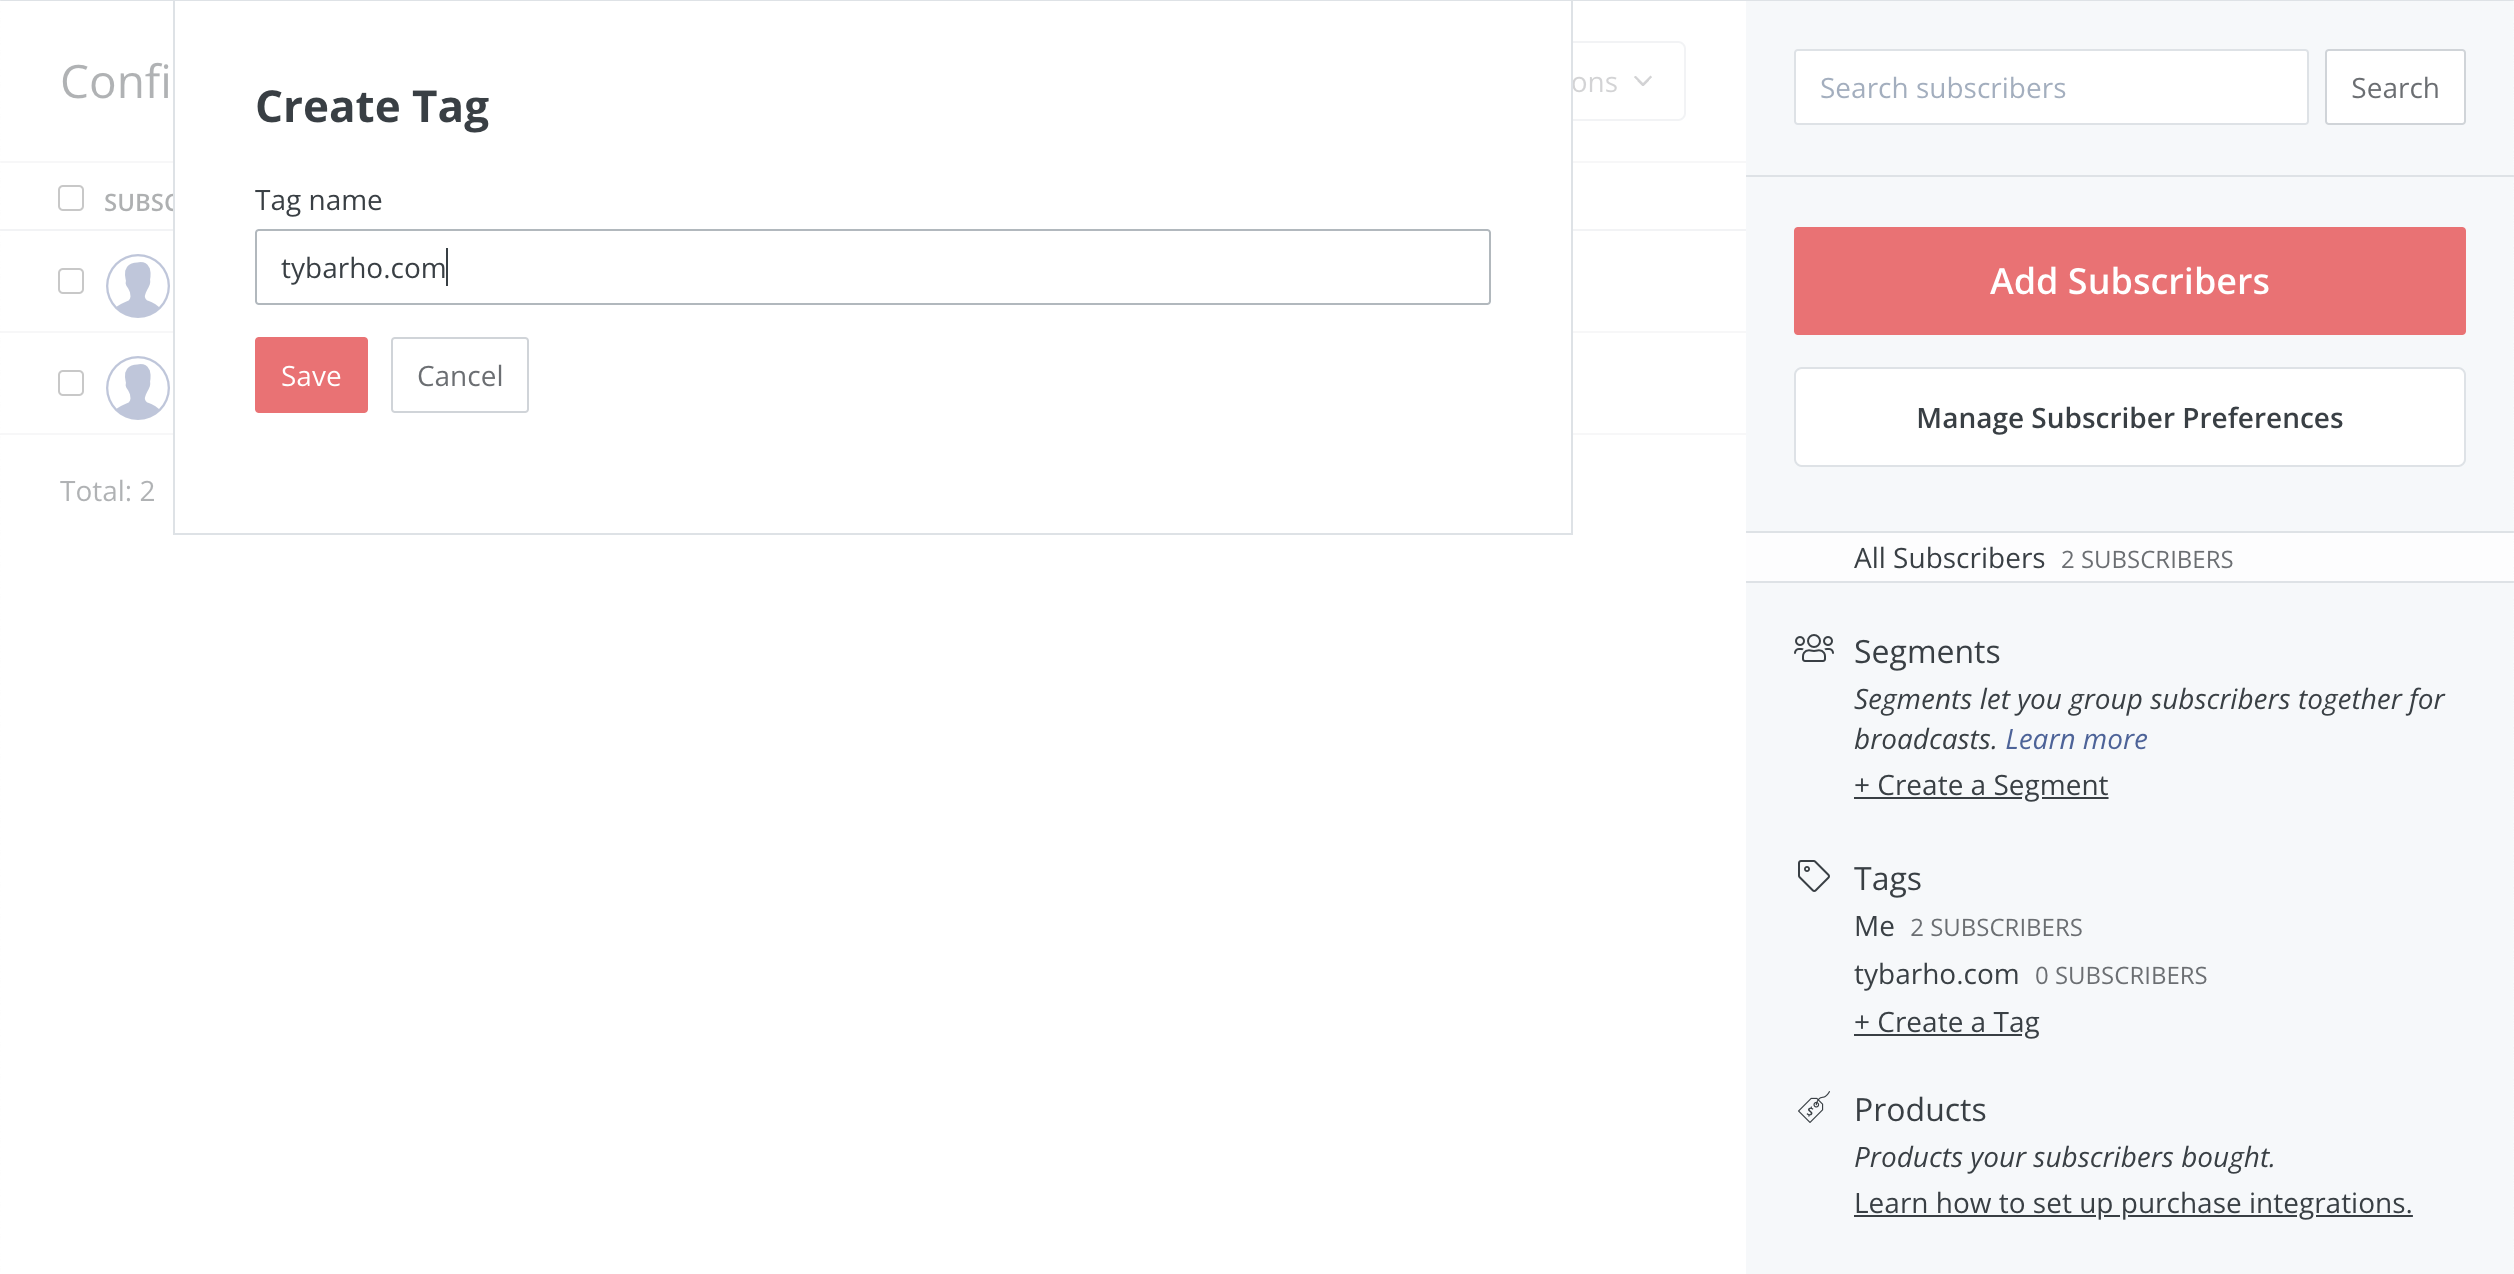
Once you've created an account, you're going to want to create a tag to bucket users that register from your site.
So go to Grow > Subscribers from the nav bar...

Then at the bottom right, click + Create a Tag (it's small and hard to find... ahem 😳).
Add a NextJS /api route
Now, we want to create a NextJS /api route that adds a subscriber to our list, with the new tag we have created.
Head over to the ConvertKit api docs.
You can see from the API docs that the call we want looks like this:
# Include a tag during subscribing
curl -X POST https://api.convertkit.com/v3/forms/<form_id>/subscribe\
-H "Content-Type: application/json; charset=utf-8"\
-d '{ \
"api_key": "<your_public_api_key>",\
"email": "jonsnow@example.com",\
"tags": [1234, 5678]\
}'
So we'll need a few things to get this going:
1. <form_id>
2. <your_public_api_key>
3. [1234,5678] # our tag ids
First, let's find the Form ID...
Now, to get your public_api_key, just head over to your ConvertKit account settings.
In the Advanced section, you'll find your API key.
Lastly, we need to find our Tag IDs, which is similar to finding out our form id.
We are going to want to set both of these as environment variables in our NextJS app. So let's create a file called .env.local and paste in the following:
CONVERTKIT_PUBLIC_API_KEY=your_public_api_key # Be sure and make these the actual values you got above
CONVERTKIT_SUBSCRIBE_FORM_ID=form_id # Be sure and make these the actual values you got above
Now, we're ready to make our API route.
Create a new file at /api/newsletter-subscribe, and add the following code:
// Next.js API route support: https://nextjs.org/docs/api-routes/introduction
export default async function handler(req, res) {
const { email } = req.body
if (!email) {
// Tell developers when they are missing params
res.status(400).json({ message: 'No email address provided.' });
return;
}
const api_key = process.env.CONVERTKIT_PUBLIC_API_KEY;
const formId = process.env.CONVERTKIT_SUBSCRIBE_FORM_ID;
if (!api_key || !formId) {
// Don't tell people about internal server errors
res.status(500);
return;
}
const url = `https://api.convertkit.com/v3/forms/${formId}/subscribe`;
const tags = [4062331];
try {
const body = JSON.stringify({ api_key, email, tags })
// POST a request to the ConvertKit endpoint
await fetch(url, {
method: 'POST',
headers: {
'Content-Type': 'application/json; charset=utf-8'
},
body,
redirect: 'follow'
});
// Send a non-descriptive success response
res.status(200).json({ success: true });
} catch(e) {
// Don't tell people about internal server errors
res.status(500);
}
}
Now, let's see if our API route works using a cURL request from our command line.
curl --location --request POST 'http://localhost:3000/api/newsletter-subscribe' \
--header 'Content-Type: application/json' \
--data-raw '{
"email": "[youremail]+newsletter@gmail.com"
}'
I tend to just at a
+newsletter to my normal Gmail account, like ty+newsletter@[yourdomain].com.
If everything works, you should get a line back like this:
{"success":true}
Once you've confirmed your subscription, go back to your ConvertKit Subscribers, and you should see test@example.com in your subscribers list!
API Routes do not specify CORS headers, meaning they are same-origin only by default. You can customize such behavior by wrapping the request handler with the CORS request helpers.
So where we would typically need to add some sort of security, Next takes care of this for us.
Now, alls we need is a form. 🛠
Create the Subscribe Form
I'm gonna burn through this with a couple of big code blocks, so if you're new to forms be sure to check out my post on quickly building forms with NextJS, React Hook Form, and TailwindCSS.
Create a new file at /components/Newsletter.jsx and paste the following code:
import { useState } from 'react'
import { useForm } from 'react-hook-form'
import * as yup from 'yup'
import { yupResolver } from '@hookform/resolvers/yup'
import { Button } from '@/components/Button'
const schema = yup.object().shape({
email: yup
.string()
.email('Please enter a valid email.')
.required('Email address is required.'),
})
function MailIcon(props) {
return (
<svg
viewBox="0 0 24 24"
fill="none"
strokeWidth="1.5"
strokeLinecap="round"
strokeLinejoin="round"
aria-hidden="true"
{...props}
>
<path
d="M2.75 7.75a3 3 0 0 1 3-3h12.5a3 3 0 0 1 3 3v8.5a3 3 0 0 1-3 3H5.75a3 3 0 0 1-3-3v-8.5Z"
className="fill-zinc-100 stroke-zinc-400 dark:fill-zinc-100/10 dark:stroke-zinc-500"
/>
<path
d="m4 6 6.024 5.479a2.915 2.915 0 0 0 3.952 0L20 6"
className="stroke-zinc-400 dark:stroke-zinc-500"
/>
</svg>
)
}
export function Newsletter() {
const [success, setSuccess] = useState(false)
const [serverError, setServerError] = useState(null)
const {
register,
handleSubmit,
reset,
formState: { errors, isSubmitting },
} = useForm({
resolver: yupResolver(schema),
})
async function onSubmit(values) {
// We'll wire this up next...
console.log(values);
}
return (
<form
onSubmit={handleSubmit(onSubmit)}
className="rounded-2xl border border-zinc-100 p-6 dark:border-zinc-700/40"
>
<h2 className="flex text-sm font-semibold text-zinc-900 dark:text-zinc-100">
<MailIcon className="h-6 w-6 flex-none" />
<span className="ml-3">Stay up to date</span>
</h2>
<p className="mt-2 text-sm text-zinc-600 dark:text-zinc-400">
Get notified when I publish something new, and unsubscribe at any time.
</p>
<div className="mt-6 flex">
<input
{...register('email')}
type="email"
placeholder="Email address"
aria-label="Email address"
className="min-w-0 flex-auto appearance-none rounded-md border border-zinc-900/10 bg-white px-3 py-[calc(theme(spacing.2)-1px)] shadow-md shadow-zinc-800/5 placeholder:text-zinc-400 focus:border-indigo-500 focus:outline-none focus:ring-4 focus:ring-indigo-500/10 dark:border-zinc-700 dark:bg-zinc-700/[0.15] dark:text-zinc-200 dark:placeholder:text-zinc-500 dark:focus:border-indigo-400 dark:focus:ring-indigo-400/10 sm:text-sm"
/>
<Button type="submit" className="ml-4 flex-none">
{isSubmitting ? 'Joining' : 'Join'}
</Button>
</div>
{errors?.email || serverError ? (
<div className="ml-3 mt-2 text-xs font-light text-red-600">
{errors?.email?.message || serverError}
</div>
) : null}
{success ? (
<div className="ml-3 mt-3 text-xs font-light leading-5 text-green-700">
Thanks for joining! Check your email for a confirmation.
</div>
) : null}
</form>
)
}
This should give you a presentable looking Tailwind newsletter subscribe form, complete with schema-based validation, and ready for server errors & success messages.
Wire the Form up to the /api route
Now we need to connect our form up to our API route.
We will handle this in our onSubmit() handler that we provided to the form.
//... rest of file
export function Newsletter() {
const [success, setSuccess] = useState(false)
const [serverError, setServerError] = useState(null)
const {
register,
handleSubmit,
reset,
formState: { errors, isSubmitting },
} = useForm({
resolver: yupResolver(schema),
})
async function onSubmit(values) {
// Reset the server error (if there is one)
setServerError(null)
// Grab the email off of the form values
const { email } = values
try {
// Send the request to our API
await fetch('/api/newsletter-subscribe', {
method: 'POST',
// Be sure and set the content type header if using fetch()
headers: {
'Content-Type': 'application/json; charset=utf-8',
},
body: JSON.stringify({
email,
}),
})
// Set success to true to show the success message
setSuccess(true)
// Reset the form
reset()
// Hide the success message after a while
setTimeout(() => {
setSuccess(false)
}, 3000)
} catch (e) {
// Log the error, and set server error message
console.error(e)
setServerError('There was an error subscribing.')
}
}
return (
{/* ... our form ...*/}
)
}
And that's it! With that in place, you should have a nice Newsletter form that looks like this:
The last thing we need to do is wire up our environment variables to Vercel deployments.
Wiring up Vercel
I'm a big fan of using CLI's when possible. It helps me learn how to save time by staying in the terminal but is also critical to gaining knowledge on CI / CD pipelines. If you're ignoring devops, don't. It can be a game changer. Don't believe me? Checkout what the illuminary Kent C. Dodds has to say about automation.
That said, let's be sure we have the Vercel CLI installed:
yarn global add vercel@latest
Now, pretending like we're new to this, let's see what it can do... remember, no browser help here:
vercel --help
This is going to spit out a big list of commands you can run, like this:
Vercel CLI 31.4.0
▲ vercel [options] <command | path>
For deploy command help, run `vercel deploy --help`
Commands:
Basic
deploy [path] Performs a deployment (default)
dev Start a local development server
env Manages the Environment Variables for your current Project
git Manage Git provider repository for your current Project
help [cmd] Displays complete help for [cmd]
init [example] Initialize an example project
inspect [id] Displays information related to a deployment
link [path] Link local directory to a Vercel Project
ls | list [app] Lists deployments
login [email] Logs into your account or creates a new one
logout Logs out of your account
promote [url|id] Promote an existing deployment to current
pull [path] Pull your Project Settings from the cloud
redeploy [url|id] Rebuild and deploy a previous deployment.
rollback [url|id] Quickly revert back to a previous deployment
switch [scope] Switches between teams and your personal account
Advanced
alias [cmd] Manages your domain aliases
bisect Use binary search to find the deployment that introduced a bug
certs [cmd] Manages your SSL certificates
dns [name] Manages your DNS records
domains [name] Manages your domain names
logs [url] Displays the logs for a deployment
projects Manages your Projects
rm | remove [id] Removes a deployment
secrets [name] Manages your global Secrets, for use in Environment Variables
teams Manages your teams
whoami Shows the username of the currently logged in user
Global Options:
-h, --help Output usage information
-v, --version Output the version number
--cwd Current working directory
-A FILE, --local-config=FILE Path to the local `vercel.json` file
-Q DIR, --global-config=DIR Path to the global `.vercel` directory
-d, --debug Debug mode [off]
--no-color No color mode [off]
-S, --scope Set a custom scope
-t TOKEN, --token=TOKEN Login token
Examples:
- Deploy the current directory
$ vercel
- Deploy a custom path
$ vercel /usr/src/project
- Deploy with Environment Variables
$ vercel -e NODE_ENV=production
- Show the usage information for the sub command `list`
$ vercel help list
It looks like the one we're going to care about is vercel env, so let's check the help for that command:
vercel env --help
Which should output something like this:
Vercel CLI 31.4.0
▲ vercel env [options] <command>
Commands:
ls [environment] [gitbranch] List all variables for the specified Environment
add [name] [environment] [gitbranch] Add an Environment Variable (see examples below)
rm [name] [environment] [gitbranch] Remove an Environment Variable (see examples below)
pull [filename] Pull all Development Environment Variables from the cloud and write to a file [.env.local]
Options:
-h, --help Output usage information
--environment Set the Environment (development, preview, production) when pulling Environment Variables
--git-branch Specify the Git branch to pull specific Environment Variables for
-A FILE, --local-config=FILE Path to the local `vercel.json` file
-Q DIR, --global-config=DIR Path to the global `.vercel` directory
-d, --debug Debug mode [off]
--no-color No color mode [off]
-t TOKEN, --token=TOKEN Login token
-y, --yes Skip the confirmation prompt when overwriting env file on pull or removing an env variable
Examples:
- Pull all Development Environment Variables down from the cloud
$ vercel env pull <file>
$ vercel env pull .env.development.local
- Add a new variable to multiple Environments
$ vercel env add <name>
$ vercel env add API_TOKEN
- Add a new variable for a specific Environment
$ vercel env add <name> <production | preview | development>
$ vercel env add DB_PASS production
- Add a new variable for a specific Environment and Git Branch
$ vercel env add <name> <production | preview | development> <gitbranch>
$ vercel env add DB_PASS preview feat1
- Add a new Environment Variable from stdin
$ cat <file> | vercel env add <name> <production | preview | development>
$ cat ~/.npmrc | vercel env add NPM_RC preview
$ vercel env add API_URL production < url.txt
- Remove a variable from multiple Environments
$ vercel env rm <name>
$ vercel env rm API_TOKEN
- Remove a variable from a specific Environment
$ vercel env rm <name> <production | preview | development>
$ vercel env rm NPM_RC preview
- Remove a variable from a specific Environment and Git Branch
$ vercel env rm <name> <production | preview | development> <gitbranch>
$ vercel env rm NPM_RC preview feat1
One thing I love about the Vercel CLI is all the helpful examples they give you.
Most CLI tools I've used (even good ones like Heroku) don't give you all the great examples for common use cases. Nice work there Vercel. 🎉
So to add our environment variables, it looks like we're going to want this command:
vercel env add <name>
We could use the Add a new variable for a specific Environment example, and you would definitely
do this if you were adding variables for something like a database, where you had specific environments
or if you wanted to have a "staging" setup for ConvertKit. I don't, and I'm fine with all of
my test environments working just like production for newsletter subscriptions (at this point in time).
So I'll just use:
vercel env add CONVERTKIT_PUBLIC_API_KEY
When it prompts you for the value, paste in your key and hit enter. Then, it will ask what environments you want to add the variables. For this circumstance, press a (for all), and hit enter.
Then, do the same thing for CONVERTKIT_SUBSCRIBE_FORM_ID.
vercel env add CONVERTKIT_SUBSCRIBE_FORM_ID
Now, you should be all set. You may need to redeploy your app if you don't have a new commit going out soon.
Conclusion
And there you have it! A ConvertKit newsletter subscription form that you can use on your site.
If I were going to take this to the next steps (which I did), I would add this to my MDXComponents
file so that I can just add <Newsletter /> tags whenever relevant.
Hope this was helpful, and happy coding! 🦄⚡️
If you enjoyed this article, please consider following me on Twitter